Registration – Audit – Accreditation

Registration, Audit & Accreditation for Protocol Markets


This page provides information and resources to assist growers and packhouses with the registration, audit and accreditation process for accessing the protocol markets (Japan, Thailand and India).

Currently, only Western Australian growers and packhouses can register and be accredited to export to Japan and Thailand, however India is open for all regions of Australia. This page provides an all-encompassing overview on how to prepare you and your business to undertake the process for registration, audit, and accreditation. Some of the resources available from this webpage relate to Japan however these resources are also relevant for those wishing to export to Thailand and India. However, please refer to your country specific protocol in Micor for guidance.

To ensure you are preparing for the market you seek, you must prepare your business against these protocol specific requirements by carefully reading and understanding the country specific protocol which can be located on Micor. To apply for Micor access and to view the country specific protocol, please visit this page – Micor Apply for Access.

Very important – to receive registration notification from the Department of Agriculture, Fisheries and Forestry (DAFF) for the specific country you wish to register and export to, you need to be subscribed to DAFF’s Industry Advice Notice. Subscribe to DAFFs Industry Advisory Notices (IAN) for plants at agriculture.gov.au/export/ controlled-goods/plants-plant-products/ian.

Western Australian and Riverland (Tristate) growers and packers have access to export fresh, hard, mature HASS avocado variety to the Japanese market. Due to an ongoing fruit fly outbreak in the Riverland region, growers and packers from the Riverland region do not have access to Japan until further notice given by DAFF. If you are a grower or packer from the Riverland region and wish to learn more about the current state of the fruit fly outbreak, please refer to South Australian Primary Industry and Regions (PIRSA) link – Fruit Fly In South Australia. If you have any technical enquiries about fruit fly monitoring in the Riverland region, please contact David Hall from PIRSA, Manager, Logistics & Monitoring, Biosecurity – david.hall@sa.gov.au

  • A virtual online Japan Avocado Export Information Session took place on Friday 17 March 2023. The information session provided important information relating to the online registration/application process, the Japan protocol, the audit process, and other general updates. If you missed this information session you can view the DAFF “Accredited property registration and protocol requirements” presentation here and the full video of the information session here. Please note that although this is catered for Japan, it remains a very helpful resource to help prepare for your India registrations, particularly the section for online registrations starting at 27.00 minutes. It is highly recommended those wishing to register for India watch this section with interest. For any audit specific enquiries email auditservices@agriculture.gov.au
  • For any protocol or export specific enquiries email  horticultureexports@agriculture.gov.au

Register a crop monitor on LearnHub. If you do not already have access to Learnhub, email your first and last name, preferred email address and state that avocado is the commodity you are interested in receiving training in to horticulturetraining@aff.gov.au

Important resources to help prepare for your application, accreditation, and audit

Avocados Australia has developed a range of materials, fact sheets, and provided important links to government resources to assist growers and pack houses in preparing to export to Japan, Thailand and India.

Growers (click the link to download the PDFs)

Packhouses (click the link to download the PDFs)

2023 Sequence of Events

OVERVIEW – SEQUENCE OF EVENTS
·       DAFF send out Industry Advice Notice (IAN) with details pertaining to registration dates
·       Online registrations open
·       Online registrations close
·       AAL review registrations for completeness
·       AAL provide list to DAFF (Horticultural Exports Program and Audit Advisory Board)
·       DAFF release audit schedule to growers and packers
·       DAFF undertake a pre-season audit or an in-season audit for ALL growers and packers. In season eligibility is determined by DAFF, and generally based on the registrant’s prior export credentials and experience.
·       DAFF send approval list to trading partner for review (not a requirement for India)
·       Export commences for trading partner approved growers and packers
·       Only Japan and Thailand undertake in-season, onsite audits, for growers and packers. India will not undertake onsite audits.

Additional resources from DAFF

Contacts
Key reference materials for growers and packers

Additional resources from Avocados Australia

  • Read more about the status of avocado exports here, in our BPR Export module
  • Access/download Avocados Australia’s Maximum Residue Limit (MRL) APP:
    FOR ANDROID MOBILES click here | FOR IPHONES click here
  • Find the current Crop Monitor training information here
  • Check our import/export market reports in the BPR Library for further analysis

For more information contact Richard Magney, Chief of Export – Market Access at marketaccess@avocado.org.au or 0477 969 607.
Export Reports


Export reporting straight from the source.


Global Trade Reports – Annual Reports

17 August 2023 – Australian avocado exports and imports – July 2022 to June 2023

November 2023 – 2022/23 Avocado Global Market Trends

November 2023 – Avocado Producers & Market Suppliers – Market Analysis 2022/23

15 February 2023 – Australian avocado exports and imports – January to December 2022


Monthly & Weekly Reports

2024

JAN

Monthly Export/Import Report 14 January 2024
21 January 2024 28 January 2024

FEB

Monthly Export/Import Report 11 February 2024
18 February2024 25 February 2024

MAR

Monthly Export/Import Report 3 March 2024 10 March 2024
17 March 2024 24 March 2024
31 March 2024

APR

Monthly Export/Import Report 7 April 2024 14 April 2024
28 April 2024

MAY

Monthly Export/Import Report 12 May 2024
19 May 2024 26 May 2024

JUNE

Monthly Export/Import Report 9 June 2024 16 June 2024
23 June 2024 30 June 2024

JULY

Monthly Export/Import Report 14 July 2024
21 July 2024

AUG

4 August 2024 11 August 2024
18 August 2024 25 August 2024

SEPT

15 September 2024

OCT

6 October 2024


To view Export monthly & weekly reports for the years prior to 2024 click here.
All of the reports are listed under the “Export” heading.

Select, order and plant the trees


Key Resources

» BPR section on Varieties

» BPR section on Rootstocks

» Video: How to plant an avocado tree 2017 – DAF (4 mins)

Selecting varieties

  • The Australian market is dominated by two varieties, Hass (83% of the industry) and Shepard (14% of the industry), both these varieties have a spreading growth habit.
  • Shepard is sensitive to cool conditions and is only suitable for the warmer areas of central and north Queensland.
  • Other commercial varieties include Gem® and Reed which have a more upright growth habit and Carmen®, Wurtz, and Sharwil which have a more spreading growth habit.
  • Choose varieties that have market acceptance and suit your growing environment

Selecting rootstocks

  • Rootstocks have a major effect on tree growth and health.
  • There are a wide range of seedling and clonal rootstocks available from commercial nurseries in Australia.
  • Rootstock characteristics which should be taken into account when selecting include having some tolerance to Phytophthora root rot, adaption to the climate of the orchard, and some tolerance to salinity if this can be an issue.
  • Seedling rootstocks are less expensive but result in a more variable orchard.
  • Clonal rootstocks are more expensive but produce a more uniform orchard.
  • Seek local advice.

Tree spacing

  • In tropical and subtropical climates avocados should be planted at low to medium density. In cooler climates avocados can be planted at low, medium or high density.
  • The main consideration is that the higher the planting density the higher will be the level and intensity of management.
  • A typical row and tree spacing options are:
Option Row spacing (m) Tree spacing (m) Number of trees per hectare Comments
Low density 10 – 12 8 – 12 69 – 125 Lower setup costs but lower early returns. Larger trees so less issues controlling canopy vigour, however picking costs higher but more dangerous, poorer spray cover which leads to lower yield and quality.
Medium density 8 – 9 5 – 7 159 – 250 Most common option in new orchards. Tree height and width must be regularly controlled.
High density 6 – 7 3 – 6 278 – 555 Higher setup costs, but also higher early returns. Difficulties and higher costs controlling tree vigour and crowding. May involve extra tree removal costs.


  • Ultra-high density plantings such as those being experimented with in Chile (where the climate is relatively cold and the soils are poor) have not been successful in Australia to date.

Ordering trees

  • Once variety, rootstock and tree density have been chosen it is important to order your avocado trees at least 12 months before intended planting.
  • Growers are advised to purchase from an Avocado Nursery Voluntary Accreditation Scheme (ANVAS) nursery. These nurseries follow strict hygiene procedures ensure planting material is of a high standard and free from diseases such as Phytophthora root rot.

Planting trees

  • First inspect trees to ensure that they are healthy, have a sound graft union and that their roots are not diseased, severely pot bound or have a benched tap root. Do not plant weak or diseased plants.


  • Store trees on raised platforms until planting to ensure good drainage and to prevent contact with the soil. Choose a location where trees are protected from the wind.
  • Keep the potting mix moist using clean or treated water.
  • If trees are sun-hardened place them in full sunlight straight away. If trees have not been sun-hardened use shade cloth to progressively harden them.
  • Consider spraying trees with a ‘sunscreen’ to reduce transplant shock.
  • Before planting, paint the stem all the way down with a white, water-based paint to protect against sunburn.
  • Plant trees within a few days of receival. In frost prone areas plant in spring, well before hot weather. Where winters are warm plant in autumn. Do not plant during the heat of the day.
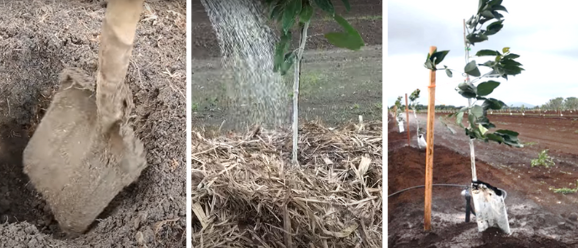
  • Irrigate the planting site the day before planting to wet the soil profile to a depth of 30 cm, and thoroughly water the bags.
  • Dig a hole that is both slightly wider and also slightly shallower than the depth of the planter bag.
  • A soil auger can be used but roughen the sides of the hole if they become shiny and ‘sealed’ by the auger’s action.
  • NEVER apply fertiliser or manure directly into the hole at planting as this is likely to burn the tree.
  • Carefully cut off the base of the plastic planter bag with a sharp knife.
  • Inspect the base of the root ball to check that the root system is sound.
  • Gently place the tree in the hole and pull the remains of the bag upwards clear of the root ball.
  • The planter bag can be left around the base of the trunk as protection against chewing animals but paint them white in hot conditions.
  • The top of the growing medium should sit slightly above ground level to ensure that even after any post-plant subsidence the tree will NEVER be in a hollow. Use your hands to carefully and progressively back fill the sides of the hole with topsoil, gently pressing the soil into contact with the root ball. Do not use your feet as this causes compaction.
  • Water thoroughly as soon as possible after planting.
  • Apply coarse mulch to a depth of 10 to 15 cm. Keep the mulch 10 cm away from the trunk.
  • Extra care is required for several weeks after planting.
  • Seek local advice about appropriate tree protection such as tree guards, stakes and protector sleeves.
  • Young trees are often killed by either under or over-watering. Install a short tensiometer into the potting mix around the root ball to monitor water requirements in the first few weeks after planting until roots begin to grow into the surrounding soil. Irrigate when the tensiometer reaches 14 centibars.

Prepare the land


Mark out the rows

  • Once the site plan has been completed (including the location, direction and spacing of rows and trees) the rows can be marked out for land preparation.
  • On flat land, rows are established as parallel lines to enable easier management and if possible running north/south for maximum light interception.
  • On sloping lands rows are established along the contour.
  • Manual location and marking of tree rows can be conducted using rows and tape measures and simple survey equipment if available.
  • GPS location of tree rows is the more common method utilised today, particularly for large plantings.

Install drains and mounds

  • On sloping land, it is very important to install diversion drains to ensure that storm water from outside the block is prevented from entering the orchard. Experience has shown that this extra water can devastate avocado trees through inundation and spread of Phytophthora spores, in some cases entire blocks of avocado trees have died.
  • The diversion drains must be designed to divert external water into stable waterways and/or dams. Steps should be taken to prevent scouring of the drain such as planting creeping grasses e.g. carpet grass, couch or kikuyu in the drain or lining the drain with concrete or rocks.
  • Contour drains are similar to diversion drains and can be established every 30 to 50m (depending on the slope) down the slope in parallel to the tree rows.
  • Shallow V-drains, no more than 20cm deep, are usually made in the centre of the interrow. They can be inserted with a grader or tractor-mounted blade.
  • Planting mounds are recommended for all situations, they should be built across the slope, at an offset gradient of 2 – 5 % to prevent water ponding within the orchard. Soil is graded from the interrow space to build the mounds. Only topsoil should be used, avoid using clay subsoil. On slopes greater than about 15% planting mounds will need to run up and down the slope for safer operation of machinery.

Pre-pant soil nutrient analysis

  • Conduct a soil analysis at least 6 months before planting. This allows time for the application of fertilisers and ameliorants (e.g. lime, dolomite, gypsum, superphosphate, copper or zinc) to condition the soil before planting.
  • Apply these fertilisers and ameliorants as early as possible to allow them time to be incorporated through subsequent ripping and cultivation and to react with the soil.

Deep rip rows

  • Rows should be deep ripped to at least 60cm when the soil is dry, this is essential for compacted soils.
  • The drier the soil profile at the time of ripping the more effective it will be for shattering compacted layers and improving drainage and aeration.
  • Take care not to bring heavy clay to the surface

Cultivate tree rows

  • At least 6 months prior to tree planting, cultivate 1 to 2m wide strips along the future tree rows. This helps prepare the soil to a friable condition to aid tree planting. It can also be used to incorporate fertilisers and reduce initial weed competition.
  • As soon as possible after cultivation, plant a cover crop (green crop) such as a grass and legume mixture into these cultivated strips to stabilise the soil from erosion and improve the general soil health, organic matter and porosity.

Have the irrigation system designed by a qualified expert and have it professionally installed

  • Engage a recognised expert in avocado irrigation design and have it installed professionally.
  • Shortcuts in these critical steps will cost the orchard dearly in terms of lost production, operational costs and management headaches.

Establish windbreaks


  • Windbreaks are used to reduce damage to branches and fruit (fruit fall and wind-rub), minimise pesticide spray drift, encourage pollinating insects and in general provide less stressful conditions for trees.
  • The aim is to provide a semi-porous filter that reduces wind velocity.
  • It is common practice to use windbreaks for new orchards.
  • Sometimes temporary windbreaks are used within the orchard for the first year or two whilst newly planted avocado trees are getting established. Plants such as bana grass, sorghum and corn are used, the stalky material can be used as mulch when no longer needed. They do provide harbourage for rats and mice so should be removed before avocados start bearing fruit.

Temporary windbreaks are sometimes used
to shelter avocado trees in the first year
or two of establishment

  • Trees and shrubs are commonly used, but shade-cloth is sometimes installed.
  • Windbreaks are sometimes removed once avocado trees are well established and creating their own micro-climate through a mutual sheltering effect e.g. after three of four years, especially once they start competing with avocados for moisture, nutrients and sunlight.

Living windbreaks

  • Use existing stands of timber where possible, otherwise plant windbreaks well before the orchard is established.
  • They may need irrigation and nutrition.
  • Depending on the species they can compete with avocado trees for moisture, nutrients and light.
  • Require maintenance such as pruning to limit size, cleaning up fallen branches, deep ripping to prevent roots invading the orchard etc.
  • They may harbour pests such as rats.

Shade-cloth windbreaks

  • Can be expensive initially.
  • Provide shelter from the moment they are installed.
  • Don’t compete with avocados for moisture or nutrients.
  • Have much lower surface area for absorbing spray drift.

Location

  • Windbreaks should be located on the sides of the orchard exposed to prevailing winds, or beside buildings and public roads where spray drift is a concern.

Design

  • Often involve establishment of more than one row of plants. Generally, two or three rows are required to produce an effective windbreak to provide a consistent, semi-porous filter from ground level up to the desired height.
  • A semi-porous windbreak acts like a filter and allows a small amount of wind to pass through the windbreak without leading to excessive air turbulence, it also maximises the distance of windbreak effectiveness.
  • An effective windbreak will reduce windspeeds in the orchard for a horizontal distance of up to ten times the windbreak height. The greatest protection is provided within a horizontal distance of five times the windbreak height.

Species selection

  • Selection of windbreak species is important to ensure that they provide effective shelter, do not compete aggressively with the avocados and are suited to the local environment.
  • Seek local knowledge to select the most appropriate species.
  • More than one row and more than one species are generally needed. A short, bushy species is planted on the windward side, a medium height species next and the tallest species last. This design helps direct wind upwards, as well as minimising shading of the smaller species.
  • Short shrubs and trees such as lillypillys (Syzigium) and bottle brushes (Callistemon sp.) can provide good protection at the low level.
  • Taller species such as eucalypts and pine trees may provide good protection at the highest level.
  • Casuarinas (she-oaks) are one of the most suitable options. River sheoak (Casuarina cunninghamiana) is the best performer, as it has rapid growth, retains branches to ground level, has an even, semi-porous canopy and can grow up to 15m tall. As a result, these are often used in single-species windbreak plantings, from one to three rows deep. The needle-like leaves also provide a greater surface area than ordinary leaves for absorbing spray drift.
  • Non-spreading bamboo can provide protection at all heights.

A well-established bamboo windbreak

Plan the orchard layout


Introduction

Orchard layout depends on:

  • Cultivar (upright varieties such as Reed and Lamb Hass can be planted closer than other varieties such as Hass and Shepard)
  • Amount of land available and slope
  • Growing conditions (the level of tree vigour expected from the soil and environment)
  • Machinery access (safe machinery operation e.g. tractors, cherrypickers and pruners)
  • Canopy management system to be used during the life of the orchard.


Tree Spacing

The canopy management system to be used must be considered at the same time as the planting density is chosen.

  • Low Density Plantings
    • g. 12 x 12m; 10 x 10m and 10 x 8m (69 – 125 trees/hectare)
    • Provide lower early returns per hectare
    • Lower establishment costs and less pruning and tree removal costs in later years
    • Results in large trees with increased harvesting costs, reduced picker safety and more difficult to spray for effective pest and disease control.
  • Medium Density Plantings
    • g. 8 x 7m; 9 x 6m; 10 x 5m; 7 x 7m and 8 x 5m (178 – 250 trees/hectare)
    • Most plantings in Australia fall within this category.
    • Tree width and height will need to be controlled as crowding occurs, in order to maintain orchard access, allow effective pest and disease control and improve light penetration.
  • High Density Plantings
    • g. 6 x 5m, 7 x 3m and 6 x 3m (278 – 555 trees/hectare).
    • Provide higher early returns per hectare.
    • Higher establishment costs.
    • Not suitable for tropical or subtropical environments where vigorous tree growth is expected.
    • More appropriate for cool environments.
    • Will need a higher level of canopy management.
    • High densities are more suitable for upright varieties such as Reed and Gem.


Row Direction

  • To maximise light penetration into the orchard it is recommended that trees are planted in rows running in a north-south direction, especially for orchards at higher latitudes.
  • However, row direction needs to suit the slope of the site.
  • On slopes greater than 15% rows should run up and down the slope to allow safe machinery operation.
  • Ensure appropriate erosion control measures are in place in orchards where rows are running up and down the slope.


Planting Configuration

  • Trees are planted either on a square or rectangle configuration.
  • A rectangle configuration where trees are spaced closer within the row than between the rows is favoured and allows the creation of hedgerows.
  • Trees can also be planted in a regular or alternate arrangement.
  • The regular planting arrangement is more common, particularly in hedgerow systems. However, an alternate planting arrangement may allow better light penetration into the orchard.

Planning the orchard is complex and it is recommended that you get expert assistance.

Here is a brief overview of what’s involved in planning an orchard layout.


Develop a plan

  • On a map of the intended orchard site, mark existing features such as roadways, standing timber, gullies and slope direction.
  • Then develop a plan showing access roads, buildings, windbreaks, tree rows, surface drains to control runoff, and dam sites.
  • Your aim is to achieve maximum productivity with minimal environmental impact.

An example of an orchard design plan.

Important points to consider.

  • Land clearing.  If you are intending to clear land for your orchard, first check your local tree clearing laws with both your local authority and State Government.
  • Provision for windbreaks.  Windbreaks are used to reduce wind damage to fruit and canopies, and to minimise pesticide spray drift. Windbreaks should be located on the sides of the orchard exposed to the main prevailing winds or beside buildings and public roads. Use existing stands of timber where possible, otherwise plant windbreaks well before the orchard is established.
  • Slopes.  Flat ground or slopes of less than 15% are preferred as these are less susceptible to soil erosion, allow flexibility with row layout, and enable tractors and machinery to be operated safely. Slopes of more than 15% should be avoided, but if used require specialised design advice.
  • Row direction and length. Locate tree rows in a north-south direction to maximise light interception for the trees. However, row direction needs to suit the design requirements of the irrigation and drainage systems. Consult a qualified irrigation designer for assistance. On slopes of less than 15%, rows can run across or up and down the slope. On slopes of more than 15%, rows must run up and down the slope to allow safe machinery operation. Long rows are preferred for efficient mechanisation but include breaks in the rows to facilitate harvesting.
  • Internal soil drainage
    • Map the soil drainage by digging a series of test holes across the site to the following depths:
      1 metre, where rainfall is less than 700 mm/year.
      • 1.5 metre, where rainfall is 700 to 1500 mm/year.
      • 2 metre, where rainfall is over 1500 mm/year.
    • Record the soil texture, water infiltration and the presence of impervious layers. Do not plant areas with major drainage problems.
    • Identify marginal drainage problem areas for mounding and/or subsurface drainage.
  • Surface drainage
    • Uncontrolled water runoff removes valuable topsoil and exposes roots to desiccation. It may also cause ponding within the orchard, exacerbating waterlogging and root rot problems.
    • Surface drains are essential to carry water safely through the orchard. A drainage system normally consists of a diversion drain at the top of the orchard, cross-slope drains or v-drains within the orchard, and down-slope waterways to carry the water to a dam or watercourse.
    • On slopes of 4 to 15% where rows and drains run across the slope, the ideal is to locate them as close as possible to the contour with a fall of 2 to 5% to remove water safely.
    • Where rows run up and down the slope, major cross-slope contour drains will be required at least every 30 to 50 m down the slope.
  • Mounds. Mounds are recommended for almost all orchards to improve soil depth, drainage and prevent water ponding around the trees after high rainfall events. Where mounds run across the slope, it is essential to ensure they do not act as dams. There should be a fall of 2 to 5% along the mounds to prevent water ponding within the orchard.


Mounds running across a slope have ponded water, resulting in poor health of the trees in the background.

Mounds should be breached where damming occurs.

  • Watercourses and dams.  Gullies, creeks and depressions should not be disturbed. Leave a buffer of trees along gullies and creek banks to keep them stable. Do not plant avocados here runoff naturally concentrates in gullies or depressions. Seek professional advice on dam siting and construction.
  • Roadways.  It is important to have all-weather access to the orchard for spraying, harvesting and other operations. Locate access roads on ridgelines wherever possible.

Prevention, monitoring and treatment


  • To reduce the impact of an infestation, improve general tree health because trees under stress from other causes are more likely to defoliate under the added pressure of six-spotted mite.
  • Always thoroughly check new planting stock for six-spotted mites, and control if necessary. If sharing machinery and equipment, including bins, always ensure they are cleaned.
  • Predators that attack six-spotted mite are naturally present in the orchard and include predatory mites, stethorus beetles and thrips. Predatory mites are the most common and can have the biggest impact. Maintain and encourage these beneficials by minimising the use of pesticides and choosing pesticide options that are ‘softer’ on these predators.
  • Monitoring is essential and every block should be monitored and managed separately because mite levels can vary widely.
  • Key monitoring times are autumn and spring. Fortnightly monitoring is recommended as they can breed quickly.
  • A x10 magnifying tool is needed to find and differentiate them from other mite species.
  • Sample recently matured leaves from multiple trees across the block to get an accurate measure of the level of SSM present in your orchard. Typically, five leaves are sampled from the inner and outer canopy of each of ten trees in the block.
  • Thresholds at which to consider applying a miticide if predatory mites do not appear to be adequately controlling the pest:
    • 10% of leaves with six-spotted mite in autumn
    • 40% of leaves with six-spotted mite in spring
  • These are guidelines only and decisions to spray also need to consider factors such as the stress level of trees (which can play a major part in whether the tree will defoliate or not), time of year (mite levels decline naturally in summer) and volume of crop on the trees.
  • Since six-spotted mite breed during winter, apply a spray in autumn if the autumn threshold is reached in order to reduce the risk of mite numbers reaching damaging levels in spring.
  • Spring is the defoliation risk period, so spray if the spring threshold is reached then. Mite levels can increase swiftly in early spring and decline rapidly in early summer.
  • With effective sprays, a single well-timed application can keep populations low in the spring risk period, however, continue monitoring after miticides have been applied to determine if the spray was successful. High volume sprays using well-calibrated sprayers that provide thorough coverage of the entire tree canopy are essential.

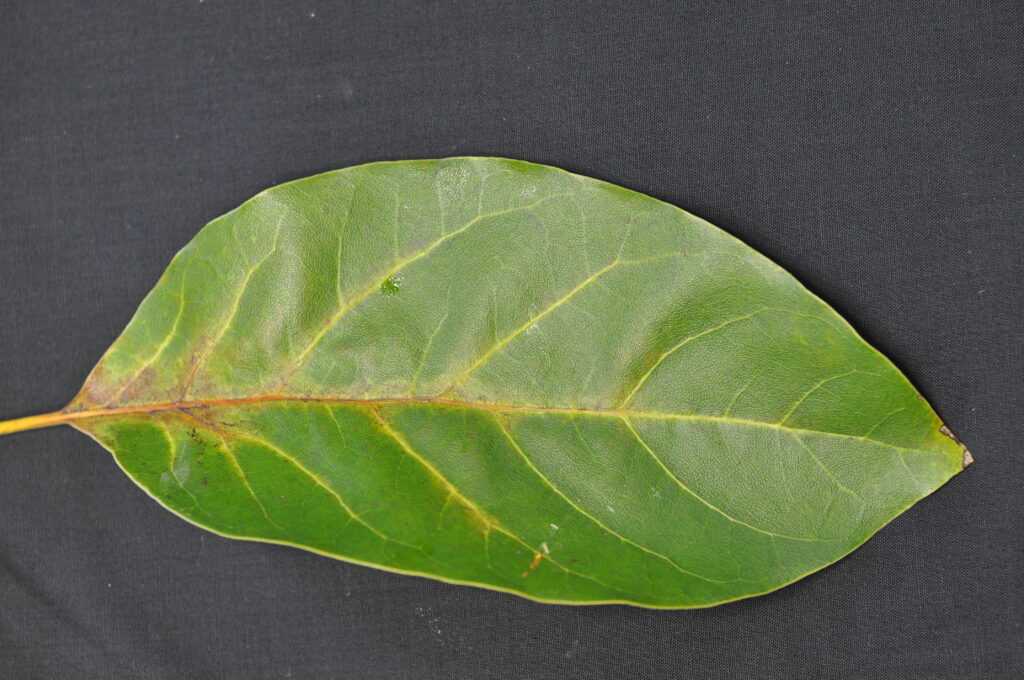
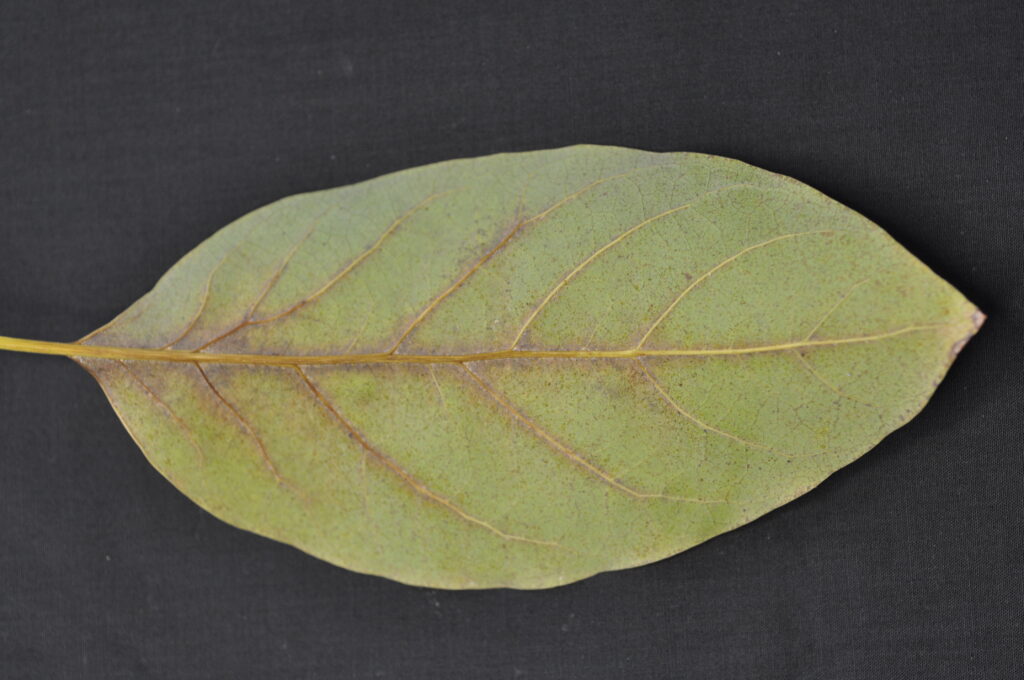
SSM attacks the lower side of the leaf generally along the veins the stem end. Symptoms can be seen on the upper (left) and lower (right) sides of leaves. Photo credit: Stewart Learmonth, DPIRD.

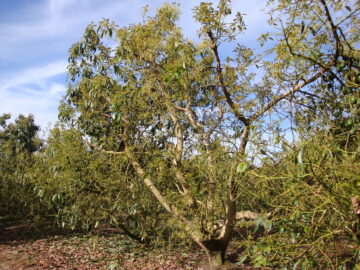
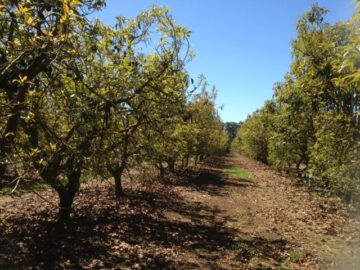
Avocado trees heavily infested with six-spotted mite can defoliate quite rapidly especially if they are also under stress from other causes. Photos by Stewart Learmonth, DPIRD.

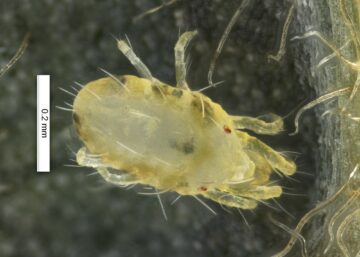
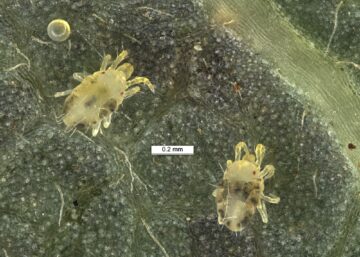
These images of six-spotted mite show the bristles and the variability in number and shape of the dark spots. Photos © Pia Scanlon, State of Western Australia (DPIRD)

Identification

  • Often the first sign of an infestation is excessive leaf fall.
  • If the cause is six-spotted mite, examination of the underside of leaves with a x10 hand lens will confirm its presence.
  • Correct identification is essential to distinguish it from other mite species, some of which are beneficial.
  • Adults are only 0.3mm long but easily visible with a x10 hand lens
  • The body is lemon-yellow to cream in colour and blunt oval in shape with eight legs.
  • The female is plump while the male is smaller, thinner and has a tapering abdomen.
  • Despite its common name (‘six-spotted’), the number and shape of the dark spots may vary considerably.
  • Many long hairs or bristles are present on the upper body surface and legs.
  • With access to a microscope, eggs of six-spotted mite can be confirmed if a spike exists on the top.
  • Mites generally feed on the underside of young leaves, mainly on the stem-end half of the leaf and adjacent to veins.
  • The feeding results in a brown/purple discolouration on the lower leaf surface and a yellowing on the upper surface.
  • Under high mite pressure trees will defoliate in spring or early summer, often quite suddenly and severely, exposing fruit to sunburn.

Six spotted mite can be confused with several other mite species that also occur on avocado leaves. Six-spotted mite do not produce webbing.

The mites species that it may be confused with are:

  1. Tydeids – common mites that are also found on the underside of avocado leaves. They are a fungus-feeding/scavenger mite, a similar size to six-spotted mite but pale grey/brown with a white stripe along their back with white legs. They commonly occur in clusters in the nook where secondary veins run off the main vein and move in a characteristic jerky motion.
  2. Phytoseiids – predatory mites are the most commonly found predatory mites in avocados. They have a tear drop shaped glossy body. Their body colours vary and include clear, yellow, orange and red/brown, usually with clear legs
  3. Stigmaeids – also predatory mites and are found in a wide variety of colours including bright yellow, orange and dark red.
  4. The tetranychid, tea red spider mite, is a pest of avocado but feeds on the upper leaf surface. See elsewhere in the BPR for details of this pest.

Note: Illustrations of some of these other mites can be found in the “Identification guide for mites found on avocado leaves” listed in the Key resources list on the first page.

Avocado Soil Health Summit 2022


The Avocado industry development and extension (AV17005) project team conducted a major study into avocado soil health in 2022. A summit was held in Brisbane in November 2022 with experienced avocado growers, researchers, and consultants to review current practices and share experiences aiming to propose changes and develop best practice adoption strategies. The group also identified knowledge gaps and highlighted regional extension needs on behalf of the Australian avocado industry.

While the summit had restricted numbers, all of the materials developed and the keynote presentation are available right here in the BPR.

The resources include:


» Keynote speakers

» Domestic guest speakers


Keynote speaker information

Dr David Crowley

As part of the 2022 Avocado Soil Health Summit Dr. David Crowley joined the summit group and avocado growers via zoom to present his theories and ideas on the management of avocados for optimisation of soil health and consistent fruit yields. David is a professor emeritus at the University of California, Riverside, where he worked for 26 years as a research scientist and professor in soil and environmental sciences.

Tony Pattison

Tony is a Principal Nematologist highly regarded both nationally and internationally in the soil health discipline. Tony has pioneered a range of innovative technologies that have greatly assisted the quantification of microorganisms within the soil that are able to interact with horticultural crops, and his theories and ideas were shared and discussed by the summit group.


More information

DAF: Bridie Carr, bridie.carr@daf.qld.gov.au or 0436 675 740

This event was part of the strategic levy investment project, Avocado industry development and extension (AV17005), part of the Hort Innovation Avocado Fund. This project has been funded by Hort Innovation, using the Hort Innovation avocado research and development levy, co-investment from the Queensland Department of Agriculture and Fisheries, and contributions from the Australian Government. Hort Innovation is the grower-owned, not-for-profit research and development corporation for Australian horticulture.